1) Console Port
2) Management Port (MGMT Port)
-Device management is essential in device provisioning, implementation, operations and configuration changes.
-Inband and out of band (OOB) are 2 management approaches.
-While OOB management operates on a “management plane” that is separate from the data plane used by data traffic on the device, in-band management traffic uses the same data plane as used by data traffic.
Hence OOB management can continue to function even during the event of data traffic congestion, device glitch or network attacks in addition to improved switch security.
-Console port and dedicated Management port are 2 types of OOB management scenarios.
1)Requires a dedicated console cable. This means you have to have physical access to the appliance.
2)Console port is NOT an “out of band management” or OoBM because you can’t assign an IP address on it (unless you’ve got a console server).
This means you can’t telnet/SSH into a console port. Console port is an “up close and personal” port: You need to have physical access to the appliance in order to use the console port. Management port is an OoBM port.
Connect Laptop/PC to Router/Switch Console Port-
You must have one of these cables to complete this task:


To connect your laptop to the console port on your router:
Plug the serial DB-9 end of the console cable into the serial DB-9 port on your laptop. If your laptop has no serial DB-9 port, plug the serial DB-9 end of the console cable into the serial DB-9 end of a USB to serial DB-9 adapter and then into a USB port on your laptop.
NOTE:If you use a USB to serial DB-9 adapter, install the adapter driver on your laptop as per the adapter documentation
Plug the Ethernet RJ-45 end of the console cable into the console port on the router. The console port is usually labeled CONSOLE in CISCO ROUTER

Step to Access Console with Putty Software
Step 1. Connect the switch to the computer using a any cable as mentioned above.
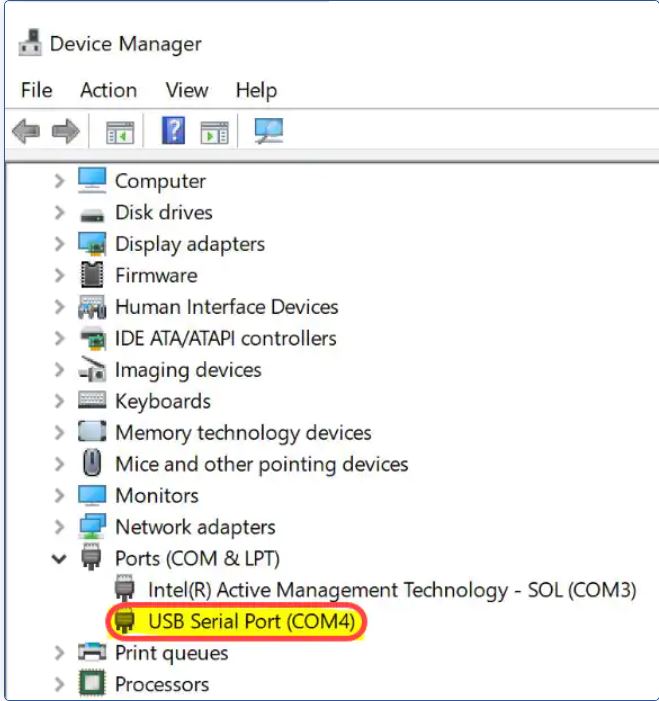
Step 2. Newer laptops don’t have Serial ports on them, so in this case you have to use a USB to Serial adapter. When plugging that into a computer it assigns a COM port number to it that is not COM1. If this is the case for you, you need to know where to look to find the correct COM port number when setting up the connection with PuTTY. Right-click on the Windows logo/Start menu and click on Device Manager to open it.

In the Device Manager, you would look to see what COM port is given to the USB adapter. In this case you would need to use COM4 for the Serial line to make the connection.
Step 3. Open the PuTTY application, Under the Connection Type field, click the Serial radio button.

Step 4. In the Category navigation field, choose Serial.

ii) In the Speed (baud) field, enter the digital transmission speed that is compatible with the switch. Normal keep it 9600 ,For 300 and 500 Series Managed Switches, the speed must be set to 115200.
iii) In the Data bits field, enter the number of data bits used for each character. The recommended value is 8.
iv) In the Stop bits field, enter the number of bits to be sent at the end of every character. The stop bit informs the machine that it has reached the end of a byte. The recommended value is 1.
v) In the Parity drop-down menu, select the method of detecting errors in transmission. The recommended method for detecting errors in transmission is None.
vi) In the Flow Control drop-down menu, select the method of preventing data overflow. The recommended method for preventing data overflow is None.
vii) Lastly Click on OPEN
The COM1 – PuTTY console window opens.
Step 5. Hit Enter on the keyboard to activate the Command Line Interface (CLI). The log in prompt is displayed:
Step 6 . Enter the username and password for console login (if set ) , by default is it cisco /cisco.
Now you have console access.
AS Management port comes with a factory default IPaddress (Normal it is 192.168.1.254 /24 in Cisco Devices)
STEP 1) You Need to connect a RJ45 Cable to connect to from Switch/Router (MGMT Port ) to PC/Laptop RJ45 Port

STEP 2) Give the IP address to you laptop from the default IP address configured pool .( If MGMT port IP is 192.168.1.254 /24 , you can assign any ip 192.168.1.1 to 192.168.1.253 )
STEP 3) Open Putty Software and select Telenet /SSH ( What ever is allowed , other wise you need to login with web browser and give user name and password and then allow the telnet /ssh ) in connection type, and type default IP address of Switch/Router.

STEP 4 ) Click on Open , you will be asked for username and password (default is cisco/cisco) ,entre username and password .

STEP 5) Now you have accessed device with MGMT Port (Further if need you can change the MGMT IP ,if Required).

